Singer Push-On Connectors
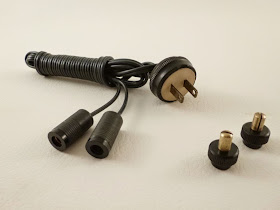
Singer push-on connectors are typically found on Singer cabinets for models 66 and 101 and Singer bentwood cases for models 99 and 128. They usually date from the early 1920's and are found on power cords, motors and foot pedals. They push onto a terminal post.
#190659 Female Connector
This is the female terminal post assembled. The inner bakelite portion unscrews from the metal outer sleeve. The ridges in the outer sleeve are actually the threads. The electrical wire has been removed from these connectors.
These are the component parts of the female connector which consist of: the outer sleeve, the inner receptacle with lug, a fiber or bakelite washer, a brass screw, and a brass washer.
#190658 Male Connector
The male connector screws onto a console and presents the male stud that the female connector pushes onto.
Rewiring a Cord with Singer Push-On Connectors:
Sometimes the outer metal sleeve can be easily removed by holding onto the bakelite insert and simply unscrewing it. Other times it is stuck pretty good.
Note also that on the opposite end of the cord, the cardboard insulator has been lost.

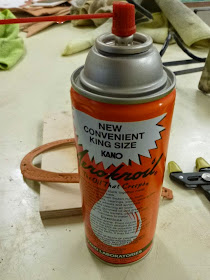
If stuck, use AeroKroil to free the threads along with heat from a hair dryer or heat gun (don't overheat which could crack the bakelite). Lightly tapping on the sleeve and insert will facilitate the oil in penetrating into the threads. It might take several days of reoiling, tapping, and heating to break the outer sleeve free. Be gentle and let time do its job... these connectors are exceedingly rare and almost impossible to replace.

As a last resort, place the outer sleeve in a vice with an adaptor made for holding round objects. Use a pair of pliers with jaw protectors to unscrew the inner portion of the connector from the outer. It can't be emphasized enough how much care must be taken here not to crush the outer sleeve in the vise or to crack the inner bakelite section with the pliers.

If stuck, use AeroKroil to free the threads along with heat from a hair dryer or heat gun (don't overheat which could crack the bakelite). Lightly tapping on the sleeve and insert will facilitate the oil in penetrating into the threads. It might take several days of reoiling, tapping, and heating to break the outer sleeve free. Be gentle and let time do its job... these connectors are exceedingly rare and almost impossible to replace.

As a last resort, place the outer sleeve in a vice with an adaptor made for holding round objects. Use a pair of pliers with jaw protectors to unscrew the inner portion of the connector from the outer. It can't be emphasized enough how much care must be taken here not to crush the outer sleeve in the vise or to crack the inner bakelite section with the pliers.
Once the outer sleeve is removed, you will see that the old wire is knotted under the bakelite washer and attached to the center stud via a brass screw and washer. The screw will be underneath a wrapping of insulating tape. Sometimes the screw has a thin coating of solder to prevent it from backing out. Discard the old insulating tape.

It will be necessary to heat the solder to remove it (don't overheat causing the bakelite to melt or come loose from the metal stud. In the photo above, a desoldering tool is used to suck the molten solder away from the screw and washer.

It will be necessary to heat the solder to remove it (don't overheat causing the bakelite to melt or come loose from the metal stud. In the photo above, a desoldering tool is used to suck the molten solder away from the screw and washer.
Clean all of the components inside and out. You may want to paint the outer sleeves at this point.

Use 18 gauge 18/2 SPT-1 wire (lamp cord). The SPT-1 uses a thinner, more pliable, insulation than SPT-2 which makes it easier to tie the knots inside the connector and wall plug.

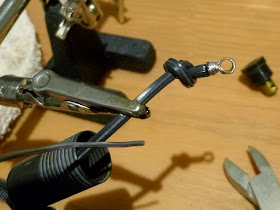
Separate the wire leads, one for each connector, and pass each lead through the metal sleeve, then the bakelite washer. Tie a knot in the wire leaving about two inches of wire beyond the knot. Strip the wire from the knot to the end and hand twist the strands.
Wrap the wire once around an 1/8" drill bit shank and twist the wire twice around itself. Cut off any remaining wire.
Using solder, tin the loop and the bit of wire back to the insulation.

Using smooth jaw pliers, squeeze the tinned wire and loop flat. This will make it easier to screw the loop to the lug.


Use an awl to round out the hole in the loop.

Attach the tinned loop to the lug with the screw and washer. Make certain that the screw is snugged down well.
Wrap the wire once around an 1/8" drill bit shank and twist the wire twice around itself. Cut off any remaining wire.
Using solder, tin the loop and the bit of wire back to the insulation.

Using smooth jaw pliers, squeeze the tinned wire and loop flat. This will make it easier to screw the loop to the lug.


Use an awl to round out the hole in the loop.

Attach the tinned loop to the lug with the screw and washer. Make certain that the screw is snugged down well.
Adjust the knot so that from the left side of the knot to the right end of the bakelite threads is one inch.

After the knot is adjusted, wrap the area between the bakelite threads and the knot with a few wraps of electrical tape to keep it isolated from the metal outer sleeve.

Slip the bakelite washer and outer sleeve down onto the inner receptacle and screw it back together.
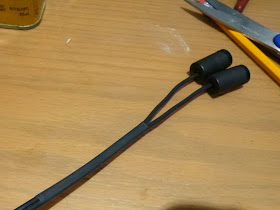
Use a two and one half inch section of heat shrink tubing to keep the wire from separating further during use.
Since the original wall plug end of the cord was still in good shape, and it maintained the vintage appearance of the machine, I decided to reuse it. Unfortunately, at some point, the cardboard insulator that fit around the metal prongs and covered the electrical connections was lost.

After the knot is adjusted, wrap the area between the bakelite threads and the knot with a few wraps of electrical tape to keep it isolated from the metal outer sleeve.

Slip the bakelite washer and outer sleeve down onto the inner receptacle and screw it back together.
Use a two and one half inch section of heat shrink tubing to keep the wire from separating further during use.
Since the original wall plug end of the cord was still in good shape, and it maintained the vintage appearance of the machine, I decided to reuse it. Unfortunately, at some point, the cardboard insulator that fit around the metal prongs and covered the electrical connections was lost.
To make a new cardboard insulator, start with a piece of copy paper and press it onto the metal prongs. Mark the inside edge of the plug by rubbing it first with your finger then highlight the resulting edge with a pencil. Cut out the pattern with a pair of scissors.
I decided to use the cardboard from an old shoebox. Place the pattern on the shoebox and trace the edge of the pattern with a pencil. Don't forget to mark the slots for the prongs.
Clean up the prong outlines and cut the new insulator from the cardboard. Place it on the plug end and trim, if necessary, until it fits well.
I used Shoe Goo to fasten the insulator to the plug since it can be easily removed in the future if need be. I then wiped on some polyurethane to seal the cardboard.
Wax up the ends and polish the brass and there you have it.
I hope this helps,
Michael
Disclaimer:
Don't attempt the techniques explained in this article if you don't have electrical experience or are not certified in electronics. Doing so may result in electrical shock and/or death. If you decide to act on these techniques, you are doing so at your own risk. It is recommended to have your work checked by a licensed electrician or certified electronics expert.


Sure wish I hadn't thrown that cord away from my Singer 128! Great tutorial!
ReplyDeleteVintage Singer Addict
Thanks...
DeleteAn excellent tutorial. I went to our newly purchased machine and pulled the connectors off the bayonets. It has the correct style of plug. One of the connectors has some of the bakelite broken but has just enough threads to scre on. The other is still stuck together but I think I will be able to fix it.
ReplyDeleteThank you for a wonderful service.
Thanks for the awesome instructions!!
ReplyDeleteHey great info... thank you..!!
ReplyDeleteHi, I've got a singer 128 but all the wiring has been taken out, leaving me with just all the little parts. Do you have any pictures or diagrams on ho the machine is wired? The ones I find online don't help :(
ReplyDeleteThanks!
http://temptedthreads.blogspot.com/2015/03/rewiring-vintage-singer-sewing-machine.html
DeleteI have a Singer 99K-13 Sewing Machine. The power cord is badly frayed. As I took one female connector off and was screwing it back on it fell apart in my hand. You instructions is just what I need to remedy the problem. I have ordered a 18/2 SPT-1 Lamp Cord with the electrical pong attached, and a friend is going to assist me in rewiring it. The only problem I am encountering is getting the female connectors unscrewed. I am just praying we don't get anxious and mess something up.
ReplyDeleteQuestions, if the connectors break or crack in the process and I am unable to get a replacement is there any other way to remedy the problem? Thanks.
ReplyDeleteYou may be able to glue them. They are reinforced by the metal outer casing when put back together. I'd experiment with gorilla glue and super glue. I think if you take your time and use the Kroil and method I've suggested, you'll be able to separate the parts without breaking them. Just be patient. I've spent weeks to free up a part.
DeleteThanks Michael. I have been successful in getting one connector separated after one day. But the other is a different story, I have worked on it 3 days and no bulging. I don't have the Koil lubricant, I Tri-Flow (does Tri-Flow works as good as Kroil. Also I am afraid to use the heatgun, thinking I might overdo it. So I just been lubricanting and tapping. So I will keep on trying. Hopefully it will separate soon.
ReplyDeleteTri-Flow won't work. If you don't have Kroil, get some Liquid Wrench. Heat really helps. Hang in there and keep tapping.
DeleteThanks Michael. Can I get the Kroil or Liquid Wrench from either the hardware or auto store?
ReplyDeleteAnother question: When attaching the tinned loop to the lug with screw and washer. What order do I attach them. I'm thinking the tin loop first, then metal washer, and then screw. Is that correct? Thanks for your help and support.
Liquid Wrench, yes. Kroil, you'll have to order... I have a link on my resource page. Liquid Wrench you'll be able to find at any hardware store. It is not as good as Kroil, but should work.
DeleteLug, tinned loop, washer, screw.
Another question: Will W-D 40 work to loosen the connector?
ReplyDeleteNo...
DeleteMichael, thanks for all your help and instructions. With a friend's help, I got the connector unscrewed, he used WD 40 and with a few turns it was unscrewed. I followed your explicit instructions. In a few minutes, I rewired the cord, and tested the machine. It is working perfectly, and making such beautiful stitches. Again, thanks. Your instructions reminded me of one of college professor. He stated, "when writing instructions, they should be so clear and precise that anyone - a child or chimpanzee can follow them and complete he task." Your instructions was that clear!! Thanks again. Wishing you a healthy and prosperous New Year!
ReplyDeleteOn my speed control, I intend to rewire that as well. Should I reinsulate the winding with some sort of tape, or varnish? I don't want it to give me a buzz when I'm working with it plugged in. Which is why I'm rewiring it.
ReplyDeleteWow! I have a nice 99k in a bentwood case with a kneebar. The cloth cord has become brittle. I'm just getting ready to do the replacement, found your instructions. Mine is wired with the motor controller in line, like a switch. I was a bit apprehensive but with your helpful pictorial, I know I can do it.
ReplyDeleteThanks for providing this help.
Angela Leonards
Where can I buy this tie of old plugs
ReplyDeleteHi--I have a Singer 66 with the two prong connector that you have described here. Do you have any information about how to re-attach the motor and the controller with this setup? I'm only finding how to reattach the three-connector setup. Thanks so much!
ReplyDeleteAre those push on connectors available anywhere? I can't find them? Richard
ReplyDeleteI actually need a cord just like the cover photo. I also need a single similar to the double in the photo but for a football. Either or. Not sure which is for the foot pedal and which is for the power.
ReplyDeleteWith their high strength and conductivity, copper lugs make wiring work feel effortless and professional. They’re definitely worth considering for clean and secure installations.
ReplyDelete